

Linux Mint 19 Tara Mint Tty1 Mint Login Updated FREE
Linux Mint 19 Tara Mint Tty1 Mint Login
Back to the home page
![]()
No operating system is flawless. Linux Mint is no exception.
Here yous'll find solutions for some bugs in Linux Mint twenty.3 (or in the applications that are office of a default installation of Linux Mint).
Contents of this page:
- 1. Tin't boot from install DVD: processor without PAE support
- two. Estimator won't boot after installation of Mint
- three. Reckoner boots straight into Windows 8.x or ten, after dual kick install
- 4. The installation of Mint can't exist finished: it fails halfway
- 5. Bandy use (swappiness) is as well high: Mint is likewise wearisome and uses the hard disk too much
- 6. Black screen or functioning problems after installation of the airtight not-costless Nvidia driver
- 7. The screen resolution is not right, afterward installation of the closed not-free Nvidia commuter
- 8. The tools for updating or installing software malfunction
- ix. Reboot fails
- 10. Hide and suspend don't always work well: they brand some computers malfunction or fifty-fifty enter a coma
-
- 10.ane. Disable suspend (suspend-to-ram)
-
-
- 10.ane.ane. How to undo
-
- 11. Workaround for a FIDO U2F Security Primal
- 12. The closed non-costless Nvidia driver won't load
- thirteen. Some laptops: hd constantly clicks and spins up and downwards
- fourteen. Wireless internet is sometimes being blocked by Bluetooth
- 15. Large PDF documents can't exist printed entirely
- sixteen. File Manager Nautilus might exist installed as unwanted actress
- 17. Can't launch any web browser
- eighteen. The size of the log files in /var/log gets out of hand
- 19. Booting takes a very long fourth dimension
- 20. A few graphics cards: disable hardware dispatch in your web browser
- 21. Repair an Xfce desktop that all of a sudden looks weird
- 22. Make your login window (LightDM) evidence a dainty background instead of eternal night
- 23. Update Managing director couldn't download all repository indexes
- 24. Calculator clock fourth dimension shifts between Windows and Linux Mint
-
- 24.i. Culling one: Setting Windows to UTC (recommended)
-
- 24.2. Alternative 2: Setting Linux to local time
-
- 24.3. How to undo local time in Linux (back to UTC)
- 25. Random freezes on Intel-based computers
- 26. Boot error concerning the unpacking of initramfs
- 27. Set up arrangement freezing trouble with AMD Ryzen CPU'south
- 28. Repair a fundamental server error for the Google repository
- 29. The Grub bootloader carte du jour of a sudden isn't subconscious anymore upon booting
- xxx. Xfce edition: the Fn keys can't control the display brightness of your laptop
- 31. Problems with your touchpad? Change the driver
- 32. The Grub bootloader card doesn't become visible on a dual boot machine
- 33. Restoring a Timeshift snapshot within the Live session seems impossible
- 34. Official bug lists for Linux Mint and Ubuntu
- 35. Want more tips?
Can't boot from install DVD: processor without PAE back up
i. Does your estimator accept an old processor without PAE back up? For many non-PAE processors from the Intel Pentium M series and Intel Celeron Yard series, PAE support can be forced. Which makes them fit for Linux Mint after all.
Y'all can force PAE upon such a processor by selecting Commencement with PAE forced in the kicking carte du jour from the Mint DVD. You lot tin can make that boot carte du jour visible by interrupting the automatic boot, by hit the space bar during the inaugural.
Computer won't boot subsequently installation of Mint
two. Some computers, later a seemingly flawless installation of Mint, won't kick. I'll depict two situations hither.
a. Yous come across the following error, in white letters on a black screen:
error: unknown filesystem
grub rescue>
In that case yous've probably used an USB retention stick for the installation (Live USB). Information technology happens sometimes, that the memory stick identifies itself as sda and the difficult deejay every bit sdb. And that's how it configures bootloader Grub then, during the installation!
After the installation bootloader Grub wants to boot from sdb, merely sdb has disappeared: the hard disk should be addressed as sda now. The installer has therefore correctly installed and configured everything for sda, except for.... Grub.
In that case it suffices to redirect Grub to sda, which you tin can do as follows. The easiest method is when you lot apply a Mint DVD for that, because then you can exist certain that at that place will be no new switching of sda into sdb in the live session.
When you don't have the pick to apply a DVD, so yous might effort a Live USB of Xubuntu 20.04 LTS, considering that one probably has no switching problem (at to the lowest degree in my limited feel).
b. In another situation yous may see one of these two errors, in white letters on a blackness screen:
mistake: invalid arch contained ELF magic.
grub rescue>
Or this error:
mistake: file '/boot/grub/i386-pc/normal.mod' not constitute.
grub rescue>
In that case the cause may be, that Mint has installed a wrong kind of boot loader. Namely Grub for EFI / UEFI (grub-efi) instead of the ordinary Chow for BIOS.
Amongst others, this happens on a Lenovo B570e laptop. Although this figurer has a UEFI and non a BIOS, this UEFI has been configured by Lenovo to behave as if it were a BIOS. That's why it needs the ordinary Chow for BIOS.
Reparation is then pretty elementary: install the ordinary Chow with the Mint DVD.
Computer boots directly into Windows viii.x or 10, after dual boot install
3. In certain cases, after an apparently successful installation of Mint next to an existing Windows eight.10 or 10, your computer might boot straight into Windows 8.x or 10. No boot menu then, in which to select Mint.
This might be caused by a wrong kick priority order in the UEFI. If so, you tin can fix information technology like this (item 2.two).
The installation of Mint can't be finished: it fails halfway
four. Peculiarly on older computers, information technology might happen that the installation of Mint suddenly fails. This could be caused by the slideshow.
During the installation of Mint you encounter a slideshow, with beautiful pictures about what to expect in your new Mint. But sometimes this slideshow creates bug: the graphics card tin can't handle it, considering the right commuter hasn't been installed yet, and the installation stalls.
In that case you can remove the slideshow similar this:
Launch a last.
(You can launch a concluding similar this: *Click*)
Use copy/paste to transfer the following control line to the terminal:
sudo apt-get remove ubiquity-slideshow-*
Press Enter.
After the removal of the slideshow you lot can launch the installer once more.
Swap use (swappiness) is too high: Mint is too slow and uses the difficult deejay too much
5. This is particularly noticeable on computers with relatively low RAM memory (four GB or less): they tend to be far too slow in Linux Mint, and Mint accesses the hard disk too much. Luckily, this tin be helped.
Notation: does your computer accept 16 GB RAM or more? And then yous tin skip this item, because with and so much RAM y'all probably won't notice whatsoever benefits from applying it.
On the hard disk there's a split up file or sectionalisation for virtual memory, called the bandy. When Mint uses the swap also much, the computer slows down a lot.
Mint'southward inclination to use the swap, is determined by a setting chosen swappiness. The lower the setting, the longer it takes earlier Mint starts using the swap. On a scale of 0-100, the default setting is 60. Which is much too high for normal desktop use. A value of something like 25 is probably the optimal compromise.
A detailed explanation can be found here (link dead? And so download this pdf file with the same content).
Now the how-to:
a. Bank check your current swappiness setting:
Launch a final window.
(You can launch a last window similar this: *Click*)
Type (use re-create/paste):
true cat /proc/sys/vm/swappiness
Press Enter.
The event will probably exist lx.
b. Then blazon in the terminal (use copy/paste):
xed admin:///etc/sysctl.conf
Press Enter.
Gyre to the lesser of the text file and add your swappiness parameter to override the default, so copy/paste the following two blue lines:
# Decrease bandy usage to a more reasonable level
vm.swappiness=25
c. Relieve the text file and reboot your figurer.
d. After the reboot, check the new swappiness setting:
Launch a terminal and type (utilise copy/paste):
cat /proc/sys/vm/swappiness
Press Enter.
Now it should exist 25.
Note: if your hard disk is an SSD, there'southward an extra reason for a decrease in swappiness. That's considering too many write deportment, like frequent swapping, reduce the lifespan of an SSD. Besides check these tips for optimizing an SSD for your Linux.
Black screen or functioning bug afterwards installation of the closed non-free Nvidia driver
half-dozen. When your calculator boots into a black screen after you've installed the closed proprietary Nvidia commuter for your video card, this is often a solution.
When your graphics suddenly perform badly, y'all can try whether reverting to the default open up source Nouveau graphics driver gives ameliorate results (strange, but in some cases this does assistance). You can simply use Commuter Manager for that.
The screen resolution is non right, after installation of the closed not-costless Nvidia driver
vii. Note: the following applies simply to Nvidia graphics cards running on the Nvidia restricted driver.
a. Launch a last window.
(You lot can launch a concluding window like this: *Click*)
Type (or copy/paste):
sudo apt-get install nvidia-settings
Press Enter. Type your password when prompted. In Ubuntu this remains entirely invisible, non even dots will testify when yous type it, that's normal. In Mint this has inverse: you'll encounter asterisks when you blazon. Printing Enter again.
b. Then type in the terminal (use copy/paste):
nvidia-settings
Press Enter.
Now you can configure your screens properly, with this handy tool from Nvidia. As follows:
- Click on "X Server Brandish Configuration" (in the upper left)
- On the right: click on the tab Brandish (probably open up already)
- Resolution:click on the arrow afterwards "Auto"
- Choose the screen resolution that you want
- Click on "Relieve to X Configuration File"
- Click on "Salve and exit"
- Do a total reboot of your computer. At present the screen resolution should be correct.
The tools for updating or installing software malfunction
8. It tin can happen that the tools for updating or installing software (Update Managing director, Software Managing director or Synaptic Parcel Managing director) malfunction, although you do have internet connectedness. The crusade is usually a problem with the software lists.
In that case, you often come across an fault report with (among other things) this text:
E: encountered a section with no package: header
E: problem with Mergelist/var/lib/apt/lists
You tin can solve this very easily: from the bill of fare, launch Software Sources. Then click on the button Maintenance then on the button Fix MergeList bug.
Ubuntu: in Ubuntu you have to do this:
a. First remove the old lists:
Launch a terminal window.
(Y'all tin can launch a terminal window like this: *Click*)
Type (use copy/paste):
sudo rm /var/lib/apt/lists/* -vf
Press Enter. Type your password when prompted. In Ubuntu this remains entirely invisible, not even dots volition testify when yous type information technology, that's normal. In Mint this has changed: you'll run into asterisks when you type. Press Enter again.
b. Now retrieve the new lists from the net:
In the terminal (utilize re-create/paste):
sudo apt-get update
Press Enter.
The problem should be over now.
Reboot fails
ix. Some laptops won't reboot. The computer simply "hangs" later on a rebooting attempt.
In most cases this has to practice with BIOS and (U)EFI. You can remedy it as follows:
a. Launch a terminal window.
(You can launch a terminal window like this: *Click*)
b. Then type in the last (use copy/paste):
xed admin:///etc/default/grub
Notice the line:
GRUB_CMDLINE_LINUX=""
...and replace information technology past this line:
GRUB_CMDLINE_LINUX="reboot=efi"
Save the changes and close the file.
c. Now event this command in the final (use copy/paste):
sudo update-grub
Printing Enter. Type your countersign when prompted. In Ubuntu this remains entirely invisible, not even dots will show when y'all blazon information technology, that's normal. In Mint this has inverse: y'all'll see asterisks when yous type. Printing Enter again.
At present shut your computer down (no reboot!). Turn information technology on over again, and after logging into your user account, endeavor to reboot it. This should piece of work now.
Hibernate and suspend don't ever piece of work well: they make some computers malfunction or even enter a coma
x. "Hide" and "suspend" nonetheless cause bug on some hardware, and unfortunately.... for much hardware there is no solution even so, because most manufacturers of BIOS and UEFI don't stick to the standards for implementing power saving.
Therefore it's better to plow off one or both of these slumber modes, if they don't work well on your estimator.
"Hibernate" (append-to-disk) is the virtually agressive of the two sleep modes, which is why it causes problems more oftentimes than "suspend" (suspend-to-ram). If "append" does piece of work well on your machine, y'all don't have to disable information technology, of class.
Both in Linux Mint and Ubuntu, "hibernate" is therefore disabled by default, but "suspend" is enabled by default. Which I think is a reasonable compromise.
Disable append (suspend-to-ram)
ten.1. You can disable suspend (suspend-to-ram) as follows (only do it when really necessary, considering it'due south generally a useful feature):
a. Launch a last window.
(You can launch a final window like this: *Click*)
b. Copy/paste the following line into the concluding (brand sure to employ copy/paste in gild to prevent typos, it's ane line!):
sudo touch /etc/polkit-1/localauthority/ninety-mandatory.d/disable-suspend.pkla
Printing Enter.
c. Copy/paste the post-obit line into the concluding (utilize copy/paste to prevent typos, it's one line!):
xed admin:///etc/polkit-1/localauthority/90-mandatory.d/disable-suspend.pkla
Printing Enter.
d. Re-create and paste the post-obit blue text into that empty text file:
[Disable suspend (upower)] Identity=unix-user:* Action=org.freedesktop.upower.append ResultActive=no ResultInactive=no ResultAny=no [Disable suspend (logind)] Identity=unix-user:* Activeness=org.freedesktop.login1.suspend ResultActive=no [Disable suspend for all sessions (logind)] Identity=unix-user:* Action=org.freedesktop.login1.suspend-multiple-sessions ResultActive=no Save the text file and close the text editor.
eastward. Reboot your computer (full reboot). Suspend should now no longer be one of the options in the shutdown menu.
f. On a laptop, it's advisable to cheque the power director settings: yous'll have to find alternatives for suspend, for actions similar closing the laptop hat.
How to undo
10.1.1. Do you lot want suspend back? The higher up hack is hands reversible. Undoing it is very simple:
Launch a terminal window.
(You tin can launch a terminal window like this: *Click*)
Re-create/paste the following line into the terminal (it's one line):
sudo rm -v /etc/polkit-1/localauthority/90-mandatory.d/disable-suspend.pkla
Press Enter. Type your password when prompted. In Ubuntu this remains entirely invisible, not even dots volition testify when you lot type it, that's normal. In Mint this has changed: you'll meet asterisks when you lot blazon. Press Enter again.
Reboot your computer. The suspend option should be back now.
Workaround for a FIDO U2F Security Fundamental
xi. There are several manufacturers that produce a USB primal for 2-factor authentication, like for instance Yubico with its Yubikey. Such a key is handy and secure.
It should work out of the box in Google Chrome, only you may have to configure Ubuntu and Linux Mint for the use of a FIDO U2F Security Primal. Similar this:
a. Install the latest Google Chrome, because that web browser is currently the all-time for using such a key. The Chrome installation parcel for Ubuntu and Mint is a .deb file, and so y'all tin simply double-click it in social club to install Chrome.
b. Launch a terminal window.
(You can launch a terminal window like this: *Click*)
c. Copy/paste the following line into the concluding (make sure to employ copy/paste in gild to prevent typos!):
sudo apt-become install libu2f-udev
Press Enter. Type your countersign when prompted. In Ubuntu this remains entirely invisible, not even dots will prove when you type it, that's normal. In Mint this has changed: you'll see asterisks when you lot blazon. Press Enter again.
d. Reboot.
eastward. Launch Google Chrome and install the key, for example for your Gmail account.
f. No avail? So try a transmission arroyo, starting with this final command:
sudo touch /etc/udev/rules.d/seventy-u2f-generic.rules
Press Enter. Type your password when prompted. In Ubuntu this remains entirely invisible, not even dots will testify when yous type information technology, that's normal. In Mint this has inverse: yous'll run across asterisks when you type. Press Enter again.
one thousand. Now open that text file for editing, with this control line (utilize copy/paste to transfer it into the terminal):
xed admin:///etc/udev/rules.d/lxx-u2f-generic.rules
Press Enter.
h. Empty all existing contents (if any) and re-create/paste the following blueish text into it (don't type information technology!):
ACTION!="add|change", GOTO="u2f_end" KERNEL=="hidraw*", SUBSYSTEM=="hidraw", ATTRS{idVendor}=="*", ATTRS{idProduct}=="*", TAG+="uaccess" Characterization="u2f_end"
i. Salvage the modified file and close information technology.
j. Reboot your computer.
k. Launch Google Chrome and install the key, for example for your Gmail account.
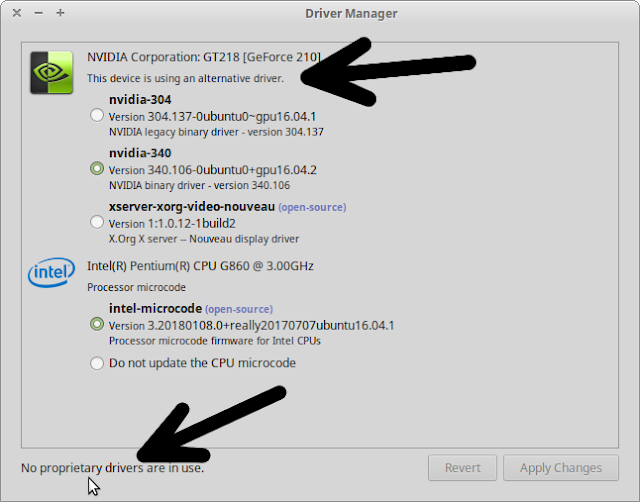
The closed not-free Nvidia driver won't load
12. In certain rare cases, the airtight proprietary graphics driver from Nvidia won't load, although yous've installed it by means of Commuter Manager (and rebooted afterwards). The old open-source Nouveau driver is still in use then....
In such a case, the window of Driver Manager looks approximately like this (click on the image to overstate it):
When that happens, this might help:
a. Launch a terminal window.
(You lot can launch a terminal window similar this: *Click*)
b. Re-create/paste the following line into your last:
xed admin:///etc/modprobe.d/blacklist.conf
Press Enter.
c. In that text file, add the following 3 bluish lines at the bottom of the existing text (use copy/paste):
# Make certain that the installed non-costless Nvidia driver is being used,
# instead of the default open up-source Nouveau driver.
blacklist nouveau
Save the modified file and close it.
d. Copy/paste the following control into the concluding:
sudo update-initramfs -u
Press Enter. Type your countersign when prompted. In Ubuntu this remains entirely invisible, not even dots will show when yous blazon it, that's normal. In Mint this has changed: y'all'll see asterisks when you type. Printing Enter again.
e. Reboot. The Nvidia driver should now exist in use, which y'all tin can check past executing the following last command:
inxi -G
Some laptops: hard disk drive constantly clicks and spins up and down
13. Some laptop difficult disks have a serious problem: they keep constantly clicking and spinning up and downward. Not all laptop hard disks have this problem: information technology depends on the brand and model.
The cause is the firmware of the disk: its power direction feature has been implemented far also agressively past the manufacturer. This is very unhealthy for the disk and may shorten its lifespan considerably.
Some operating systems comprise a built-in correction for this firmware mistake, simply many types of Linux don't.
The solution is not too difficult:
Launch a terminal window.
(Y'all tin launch a final window like this: *Click*)
Type (use re-create/paste):
sudo hdparm -B 254 /dev/sda
Press Enter. Type your password when prompted. In Ubuntu this remains entirely invisible, not fifty-fifty dots will evidence when you type it, that's normal. In Mint this has changed: you'll see asterisks when you type. Press Enter over again.
Now the nasty clicks should stop.
With this command you don't entirely disable the ability management of the deejay, merely you limit it to a minimum. Positive side effect: your laptop becomes a lilliputian faster.
The "price" you pay is a somewhat higher power consumption, and therefore a slightly decreased battery time. But not much.
The command is for the current session just. If you want to make it permanent, you lot can do this:
a. Launch a last window.
(Yous tin launch a terminal window like this: *Click*)
b. So type in the terminal (use copy/paste):
xed admin:///etc/hdparm.conf
Printing Enter.
Now text editor Xed opens a text file. Add the following blueish text, at the very end of the existing text (use copy paste to avert errors):
/dev/sda { apm = 254 apm_battery = 254 } c. Save the file, close Xed and reboot your computer (full reboot).
d. Finally, disable hibernate and suspend, because the hd will start clicking over again after waking up from those (run across particular 10 on this page).
This is really no error of Mint, merely of the difficult disk manufacturer, who provides bad firmware.... Information technology's not adept when an operating arrangement has to correct a firmware fault.
Wireless internet is sometimes being blocked past Bluetooth
14. On some laptops, wireless internet (wifi or 3G) is being blocked by Bluetooth. In that case, the solution is simple: temporarily disable Bluetooth, by clicking on the bluetooth icon in the upper panel. Then reboot your laptop. Bluetooth should remain disabled and you should be able to brand wifi or 3G connection.
If Bluetooth should exist enabled once again afterwards reboot, disable information technology more than thoroughly past disabling information technology in the BIOS of your laptop.
Large PDF documents can't exist printed entirely
15. The default PDF reader in Mint (xreader) sometimes has difficulty handling big PDF documents, which may cause printing failure.
In that case yous tin can try the PDF feature in your web browser (e.g. Firefox or Chrome).
File Manager Nautilus might be installed equally unwanted extra
16. When installing sure applications that have file manager Nautilus as "recommended" dependency, y'all get Nautilus into the bargain!
That's undesirable, considering installing a 2d full-blown file director like Nautilus aslope your default file manager, will lead to conflicts. When you suddenly find that you've got Nautilus in your bill of fare, I suggest to remove Nautilus immediately, like this:
sudo apt-become remove nautilus
This should leave all other installed applications intact, including the i whose installation pulled Nautilus. And then information technology should ever be safe to remove Nautilus.
Tin can't launch any web browser
17. On some old computers you lot can't launch any spider web browser (Firefox, Chrome, Chromium, ...), because the CPU doesn't support sse2. That support is required for the current versions of those browsers.
This is how y'all can check whether your CPU supports sse2:
Launch a last window.
(You tin can launch a terminal window like this: *Click*)
Type (use copy/paste):
cat /proc/cpuinfo | grep sse2
Press Enter.
In the output you should detect sse2 in red text. If you don't get whatever output at all, so unfortunately you can't use a web browser on that machine.
Notation: some how-to's advise in such a case, to install an older version of your web browser, that doesn't crave sse2 support. Don't do that!
Your web browser is, by far, the most heavily attacked awarding in your system. Most of the malicious software on websites, targets web browsers. So information technology's admittedly unsafe to utilize an older version of your spider web browsers, too in Linux.
The size of the log files in /var/log gets out of mitt
18. Thankfully it's a rare problem, but anyhow: some errors create huge log files in the folder /var/log, causing rapid loss of disk space. When you take this problem, you should of form ready the underlying fault(s) as shortly every bit possible.
In social club to read the gigantic log files you'd ameliorate not use a normal text editor, considering it'll probably be bogged downward past the sheer size of the file. Utilize a final command instead, and merely for the latest entries. Like this:
An case is easiest. For examining the log file/var/log/syslog, you do this:
Launch a terminal window.
(You can launch a final window like this: *Click*)
Copy/paste this command into the final:
tail -100 /var/log/syslog > disk_eater.log
(of form you should supplant syslog by the name of the actual log file that you desire to examine)
Press Enter.
That way you've created a small text file, chosen disk_eater.log, which contains the last 100 lines in the log file. Information technology'due south in your personal binder. Yous can simply double-click information technology to read its contents.
This should enable you to find the culprit, considering information technology's the mistake messages denouncing the culprit that have flooded the log.
As emergency measure you can besides limit the size of the log files, which you can do as follows:
a. First remove well-nigh log files like this:
Launch a concluding window.
(You tin launch a final window like this: *Click*)
Copy/paste the following line into the terminal:
sudo rm -five /var/log/*log*
Press Enter. Type your countersign when prompted. In Ubuntu this remains entirely invisible, not even dots will show when yous blazon it, that'south normal. In Mint this has inverse: you'll see asterisks when you type. Press Enter once again.
b. Now limit the logs for the future like this (items 10, xi and 12).
c. Reboot and bank check the available deejay infinite again.
Don't forget to solve the underlying problem! That should have a loftier priority.
Booting takes a very long fourth dimension
nineteen. On some hardware, booting lasts extremely long. You can try to find the cause of a slow boot as follows:
Launch a concluding window.
(You tin launch a terminal window like this: *Click*)
Copy/paste the following line into the terminal, to avoid errors:
systemd-analyze arraign
Press Enter.
Sometimes the Network Fourth dimension Protocol (NTP) is the culprit. If it'due south ntp.service that's eating all that time, you might try this:
Type (re-create/paste to avoid errors):
sudo systemctl disable ntp
Press Enter. Type your password when prompted. In Ubuntu this remains entirely invisible, not fifty-fifty dots volition bear witness when you type it, that's normal. In Mint this has changed: you'll see asterisks when you type. Press Enter again.
The price you pay for disabling NTP, by the fashion, is that your organisation time is no longer being synchronized with NTP servers. This is usually only a minor inconvenience.
Do y'all want to undo this? That'due south easy:
sudo systemctl enable ntp
Does your computer accept at to the lowest degree 8 GB RAM memory? Then you might be able to speed up the boot procedure past putting /tmp into the RAM.
A few graphics cards: disable hardware dispatch in your web browser
twenty. Hardware acceleration is on by default in Firefox and Chrome. Which is generally a good thing, because it should brand rendering video's smoother. Information technology usually results in smoother playback, better operation and reduced CPU usage.
Nevertheless, when yous feel graphics issues in those web browsers (delay when typing text, problems with displaying video'due south), you can try whether it helps if you disable hardware dispatch every bit follows:
Firefox:
Click on the button with three horizontal dashes in the acme right corner - Preferences - Performance:
remove the tick for: Apply recommended functioning settings
then remove the tick for: Apply hardware acceleration when bachelor.
Close Firefox and launch it again.
Chrome:
Click on the button with three dots in the top right corner - Settings - Advanced
department System: remove the tick for: Use hardware acceleration when available.
Close Chrome and launch it again.
Repair an Xfce desktop that suddenly looks weird
21. In case of an Xfce desktop (Linux Mint Xfce) that has suddenly started to expect weird, you can endeavor three things.
a. First the action with the least impact, namely a restart of the window managing director.
- Launch a terminal window.
(Y'all tin launch a terminal window like this: *Click*)
- Copy/paste the following line into the terminal, to avert errors:
xfwm4 --supplant
Press Enter.
b. Disable all visual effects. In Linux Mint, fifty-fifty lightweight champion Xfce has some relatively heavy visual effects past default. Disable them like this:
Menu button - Settings - Desktop Settings
Window Manager: set it to plain Xfwm4 (instead of Xfwm4 + Compositing)
And then remove Compiz:
Launch a last window.
(Y'all can launch a last window like this: *Click*)
Type (use copy/paste to prevent errors):
sudo apt-get remove compiz-core
Printing Enter. Blazon your countersign when prompted. In Ubuntu this remains entirely invisible, non even dots will testify when you type it, that's normal. In Mint this has changed: you'll see asterisks when you blazon. Printing Enter again.
c. If all that doesn't assist, reset your Xfce desktop to its default settings equally follows:
- Re-create/paste the following line into the terminal:
rm -r -five ~/.config/xfce4
Printing Enter.
- For the new settings to take upshot, log out and log in again.
Make your login window (LightDM) prove a squeamish background instead of eternal night
22. In Linux Mint, the characteristic of LightDM which enables you to fix a nice background for it, may accept a issues. Which in some cases causes the login window to have an ugly black background. This is how to work effectually that:
a. From the carte, launch the application Login Window.
b. Disable Draw user backgrounds (gear up the slider to off).
Then, in Background , select a static system background from /usr/share/backgrounds. I recommend to look for one in the folder /usr/share/backgrounds/linuxmint-tara, considering that contains many beautiful images.
c. Close Login Window and reboot your computer. Now the login window should present you with a dainty background.
Update Manager couldn't download all repository indexes
23. Occasionally, you might get this warning from Update Director:
Could non download all repository indexes
With this farther explanation:
An error occurred during the signature verification. The repository is not updated and the previous index files volition be used.
Plus some complaining about a missing public cardinal (NO_PUBKEY).
This might happen occasionally, when a repository maintainer changes the verification key of the repository. This means that you should load a new verification central into your system, otherwise y'all won't go updates for the packages that you've installed from that repo.
Google has been known to create such "key havoc" for the repository for its web browser Google Chrome. If it's Google that's plaguing you similar this for Chrome, you can solve it past downloading a new central like this:
a. Launch a terminal window.
(You can launch a terminal window similar this: *Click*)
b. Use copy/paste to transfer the following control line into the terminal (it's one line!):
wget -q -O - https://dl-ssl.google.com/linux/linux_signing_key.pub | sudo apt-fundamental add together -
Press Enter. Type your password when prompted. In Ubuntu this remains entirely invisible, not even dots will evidence when you lot type it, that's normal. In Mint this has changed: you'll see asterisks when you type. Press Enter once more.
That should ready it. At least until the adjacent key alter....
Computer clock time shifts between Windows and Linux Mint
24. Windows stores the fourth dimension on the hardware clock as local time. Linux Mint on the other manus, stores information technology as UTC (formerly: Greenwich Mean Time). This causes annoying clock problems on dual boot machines: the time keeps shifting.
Information technology's easiest to brand Linux Mint deport like Windows does, because Windows is more difficult to tame. It's actually a pity, considering UTC makes more sense. Especially if yous move your machine between time zones.
Below I depict two alternatives: the manner to fix Windows (recommended, just slightly more difficult) and the mode to modify Linux (non the best solution, but easier to apply). The choice is yours:
Alternative i: setting Windows to UTC (recommended)
24.1. Desire to tame Windows, even though information technology's slightly difficult? Right you are, because that's the nigh elegant solution. This is how:
Launch Regedit (Registry Editor) and click your way through to the following "directory":
HKEY_LOCAL_MACHINE\SYSTEM\CurrentControlSet\Control\TimeZoneInformation\
In that "directory", create a new value, in the following style:
Right-click with your mouse on an empty white office of the Registry Editor window -
New - DWORD (32-bit) Value
(even in 64-chip Windows you have to select 32-bit DWORD here)
Give the new value the following proper name:
RealTimeIsUniversal
Press Enter to ostend the proper noun.
So double-click the new value and set up its Value information to 1 .
By default, Base should be set to Hexadecimal, which is what you desire.
Click OK and close Registry Editor.
You're done! Now there's no need to modify your Linux.
Culling ii: setting Linux to local fourth dimension
24.ii. Don't practise this when y'all've already modified Windows as described in item 24.one!
This is how to brand Linux behave in the junior Windows way, so your time won't shift whatever more on your dual boot machine:
a. Launch a terminal window.
(You tin launch a terminal window like this: *Click*)
b. Use copy/paste to transfer the following command line into the terminal:
timedatectl gear up-local-rtc ane
Press Enter.
That should do the trick.
c. Check the condition similar this:
timedatectl status
Printing Enter.
How to undo local time in Linux (back to UTC)
24.iii. Want to undo local time for your hardware (go back to the superior default way of Linux Mint)? That'southward like shooting fish in a barrel as well. Simply use this terminal control:
timedatectl set-local-rtc 0
Random freezes on Intel-based computers
25. On certain hardware combinations with Intel CPU'southward, y'all can experience random freezes of your system. In item the Bay Trail series of Intel CPU's is known to be affected by this.
This can often be solved by sharply reducing the maximum slumber state of the CPU when idle (maximal C-state). Namely from half-dozen (or ix) to i.
The cost you pay for that is some extra ability consumption, which is of grade rather abrasive for laptops (you'll detect a somewhat higher battery drain speed). Merely at least your machine should run stable now.
Proceed like this:
a. Launch a terminal window.
(Yous can launch a terminal window similar this: *Click*)
b. Offset cheque your current max C-land. Utilise copy/paste to transfer the following command line into the terminal:
cat /sys/module/intel_idle/parameters/max_cstate
Press Enter.
The output will probably be 6 or nine.
c. Now copy/paste the following line into the terminal, in order to edit a settings file:
xed admin:///etc/default/chow
Press Enter.
d. Delete this existing line:
GRUB_CMDLINE_LINUX=""
Replace it by this line (employ re-create/paste to transfer information technology):
GRUB_CMDLINE_LINUX="intel_idle.max_cstate=1"
e. Relieve the changes and shut the modified file.
f. And then execute this command line in the terminal:
sudo update-grub
thou. Reboot.
h. Bank check the change with this command:
cat /sys/module/intel_idle/parameters/max_cstate
The output should exist 1 at present.
Kick error concerning the unpacking of initramfs
26. You might get to meet the following error during booting, which is a issues:
Initramfs unpacking failed: Decoding failed
If yous have a make clean fresh installation of Mint 20.x (no upgrade from 19.x), you'll probably be plagued by this issues. Check the system logs if you're unsure.
You should be able to solve this bug by irresolute the unpacking method from lz4 into gzip (like it was in Mint 19.x and Ubuntu eighteen.04.x), namely similar this:
a. Launch a terminal window.
(You can launch a terminal window similar this: *Click*)
b. Re-create/paste the following line into the last (it's one long line, don't chop it upward):
sudo sed -i 's/COMPRESS=lz4/Shrink=gzip/thousand' /etc/initramfs-tools/initramfs.conf
Press Enter. Type your password when prompted. In Ubuntu this remains entirely invisible, not even dots will prove when you type information technology, that's normal. In Mint this has inverse: you lot'll encounter asterisks when you type. Press Enter again.
c. Now re-create/paste the following line into the concluding:
sudo update-initramfs -u
Printing Enter. This is a resource-intensive job for your calculator; expect patiently until information technology'south finished.
d. Reboot your computer. The mistake should be gone now.
Prepare system freezing problem with AMD Ryzen CPU's
27. You lot might experience organization freezes with AMD Ryzen CPU's. This might exist a mode to piece of work around that:
I. First of all, in your BIOS (UEFI) configuration, find the following setting:
PSU Idle Control
Modify it to:
Typical Current Idle
That should cure at to the lowest degree one blazon of Ryzen freeze problems.
2. Update the AMD firmware blob past updating the linux-firmware packet to the latest version. Similar this:
a. Launch a final window.
(You can launch a terminal window like this: *Click*)
b. Copy/paste the following blue command line into the terminal (information technology's one huge line):
apt install git && git clone git://git.kernel.org/pub/scm/linux/kernel/git/firmware/linux-firmware.git && sudo cp -five -u linux-firmware/amdgpu/* /lib/firmware/amdgpu && sudo update-initramfs -uk all
Press Enter. Type your countersign when prompted. In Ubuntu this remains entirely invisible, not even dots volition testify when you type information technology, that's normal. In Mint this has changed: y'all'll see asterisks when you type. Press Enter again.
III. Now you're going to pass an actress parameter to Chow. Every bit follows:
a. Copy/paste the following bluish line into the terminal:
xed admin:///etc/default/grub
(the three consecutive slashes are no error simply intentional)
Press Enter.
(Ubuntu: supercede xed by gedit)
b. Discover the post-obit line:
GRUB_CMDLINE_LINUX=""
In that line, re-create/paste the following parameter between the quotation marks:
idle=nomwait
Then that information technology becomes:
GRUB_CMDLINE_LINUX="idle=nomwait"
c. Salvage the modified configuration file and close it.
d. Then run in the terminal (annotation the dash in the command!):
sudo update-grub
4. Reboot. Your AMD Ryzen machine should run more stable at present.
There are also some other possibilities to accost this upshot, but those are hardware-specific and therefore not fit for a generic approach for all AMD Ryzen CPU's.
Repair a key server fault for the Google repository
28. Did you install software like Google Chrome or Google Globe? And so you've also added the software repository of Google to your sources listing. Which is fine, but once in a while, that Google repository tends to start complaining about a missing key. This also affects Update Director.
If that happens, you can often simply wait until Google fixes that hiccup on its servers. But you should also be able to fix that yourself, by downloading that key once again. Like this:
a. Launch a last window.
(You can launch a terminal window like this: *Click*)
b. Utilize copy/paste to transfer the following command line into the terminal (information technology'due south 1 line!):
wget -q -O - https://dl.google.com/linux/linux_signing_key.pub | sudo apt-fundamental add -
Press Enter. Type your password when prompted. In Ubuntu this remains entirely invisible, not even dots will show when yous blazon information technology, that'due south normal. In Mint this has changed: you'll see asterisks when you type. Press Enter once more.
c. You should get to run across an "OK" message as output. Launch Update Manager and refresh information technology; it should spawn no errors anymore.
The Grub bootloader bill of fare suddenly isn't subconscious anymore upon booting
29. One time in a while, bootloader Chow may suddenly starting time showing its card upon booting, even though it e'er was subconscious. In that example, attempt if information technology helps when you poke Grub a bit:
You might be able to kicking Grub out of its evidently buggy lethargy, past setting information technology to show the menu for an unnoticeable 0.1 2nd. Thus at terminal producing the desired effect (namely existence hidden). This workaround has worked for me, in like circumstances.
Go on as follows:
a. Launch a last window.
(Yous can launch a terminal window like this: *Click*)
b. Employ copy/paste to transfer the post-obit blue command line into the terminal:
xed admin:///etc/default/grub
(the iii consecutive slashes are no typo but intentional)
Press Enter. Type your password when prompted (y'all'll be prompted twice).
c. Notice the line:
GRUB_TIMEOUT_STYLE=hidden
Change it to:
GRUB_TIMEOUT_STYLE=menu
d. Then observe the line below:
GRUB_TIMEOUT=0
Alter it to:
GRUB_TIMEOUT=0.1
e. Relieve and close the modified text file.
f. Use copy/paste to transfer the following blue command line into the final:
sudo update-grub
(if you type: notation the dash between update and grub!)
k. Reboot and examination whether the Chow carte stays properly hidden this fourth dimension.
Xfce edition: the Fn keys tin't control the display brightness of your laptop
30. Do y'all have the lightweight Xfce edition on your laptop? Then Xfce's Power Manager might need to be configured to allow the Fn keys of your laptop to control the display brightness.
That tin be accomplished similar this:
a. Menu button - Settings - Settings Editor. Make it total screen, and then you tin operate it hands.
b. In its left panel, click on xfce4-power-managing director.
In its right panel, tick (enable) the value for:
handle-effulgence-keys
c. Close Settings Editor.
d. Reboot (or log out and in over again).
Problems with your touchpad? Alter the driver
31. Does the touchpad of your laptop misbehave? Then endeavour a commuter change. Proceed like this:
a. Launch a last window.
(You can launch a final window like this: *Click*)
b. Utilise copy/paste to transfer the following command line into the terminal:
sudo apt-get install xserver-xorg-input-synaptics
Printing Enter. Type your password when prompted. In Ubuntu this remains entirely invisible, non even dots will prove when you type it, that's normal. In Mint this has changed: you'll see asterisks when you type. Press Enter again.
c. Reboot your estimator.
The Grub bootloader card doesn't go visible on a dual kick machine
32. In some cases, the menu of bootloader Grub doesn't become visible on a dual boot machine with both Linux Mint and Windows 10. Which is a known issues. Then it might help to disable the graphical rendering of the Chow boot menu, like this:
a. Launch a terminal window.
(You can launch a terminal window similar this: *Click*)
b. Re-create/paste the post-obit command line into the terminal:
xed admin:///etc/default/grub
Press Enter.
(the three consecutive slashes are intended and no typo!)
c. Remove the hash tag before the following line:
#GRUB_TERMINAL=console
So that it becomes:
GRUB_TERMINAL=console
Save the modified file and close it.
d. Copy/paste the post-obit command line into the terminal, in society to execute the modification:
sudo update-grub
Press Enter. Type your password when prompted. In Ubuntu this remains entirely invisible, not fifty-fifty dots volition show when you lot type information technology, that's normal. In Mint this has changed: you lot'll see asterisks when you lot type. Printing Enter once again.
(if you type the command: note the dash between update and chow)
e. Reboot and test: your Grub menu should be visible now.
Restoring a Timeshift snapshot within the Live session seems impossible
33. When your organization has become unbootable, you'll need to restore a Timeshift snapshot from within the Alive session, after booting from the Mint DVD / USB stick.
In that Alive session you'll probably demand to begin by telling Timeshift in its Settings (section Location) on which disk the stored snapshots are ("which location to use for snapshots"), before y'all can restore i of them. Yous probably won't be able to select a snapshot by using the Browse button in the Timeshift toolbar (which is an unfortunate usability bug).
Official bug lists for Linux Mint and Ubuntu
34. When you lot have a trouble, read both the official issues lists for Linux Mint itself and for the Ubuntu it was congenital on. These lists tin can be found hither (look for the header "Known issues" or "Known problems"):
Bug list for Linux Mint 20.2 Cinnamon
Bug listing for Linux Mint 20.2 MATE
Bug list for Linux Mint 20.2 Xfce
Bug list for Ubuntu xx.04
Desire more tips?
Do you desire more than tips and tweaks? There's a lot more of them on this website!
For case:
Speed up your Linux Mint!
Clean your Linux Mint safely
Avoid 10 fatal mistakes
To the content of this website applies a Creative Commons license.
Back to the dwelling page
Disclaimer
Linux Mint 19 Tara Mint Tty1 Mint Login
DOWNLOAD HERE
Source: https://easylinuxtipsproject.blogspot.com/p/bugs.html
Posted by: gonzalezfroned.blogspot.com
0 Response to "Linux Mint 19 Tara Mint Tty1 Mint Login Updated FREE"
Post a Comment